For this post, we will teach you a Photoshop tutorial that will create a tough metal text effect. As well, you will learn to use various drawing techniques, channels, and patterns. So let’s get started to this Photoshop tutorial!
Tough Metal Text Photoshop Tutorial
1
Step 1
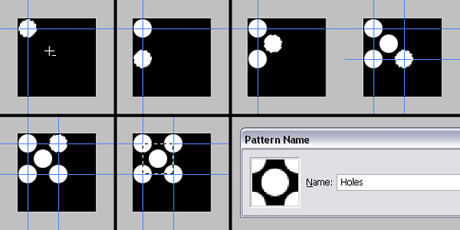
First define a pattern of dots. Let’s start by creating a new document 100 pixels wide and 100 pixels high, with a Resolution set to 300 pixels/inch. Fill the “Background” layer with black. Grab the Elliptical Marquee Tool, set the Style to a Fixed Size and set the Width and Height to 24 pixels. Click anyplace inside the canvas, then click inside the selection, drag and position it in the top-left corner of the canvas. Now, fill the selection with white. Drag one vertical and one horizontal guide to the center of the selection. Hold down the Shift key and press Down the Arrow key four times to move the selection down 40 pixels. Fill it with white. Now move the selection 20 pixels up and 20 pixels right, and then fill it with white again. Move the selection this time, 20 pixels down and 20 pixels right and fill with white.
Now drag two more guides to the center of the selection as in the image below. Now move the selection 40 pixels up and fill with white once again. Now grab the Rectangular Marquee Tool and select the area between the crossing guides as shown below. Now, go to Edit > Define Pattern and name the pattern “Holes.”
In this step, we have defined a pattern.